帮助中心
en


Learn the basic mechanics of using mining heat exhaust to warm a home from the experiences and lessons of this at-home bitcoin miner.


This article presents the first-hand experiences of TechEngineer, an at-home bitcoin miner using heat exhaust from mining machines to warm their house. Complete with photos, performance data, and some step-by-step instructions, this guide is the perfect beginner resource for miners interested in productive uses for the heat their machines create.
The date was November 29th, 2017. I was driving in my truck and heard on the radio that the price of Bitcoin had passed $10,000 for the first time in its history. That is the day that my journey began down the long and exciting rabbit hole of Bitcoin. I was intrigued and instantly drawn to the technology behind the most powerful decentralized computer the world had ever seen. I wanted to mine Bitcoin.
I attempted to buy my first miner, an Antminer S9 for a price of nearly $4,000 in the beginning of December 2017. The price of Bitcoin was skyrocketing at the time and so was the profitability of Bitcoin mining. There was a 45 day lead time on the miner I had paid for. During that 45 days I watched the price of Bitcoin peak and fall and in my FOMO I purchased a small mining contract. I learned that the incredible profitability of Bitcoin mining during a bull run does not last long. Network difficulty lags, but catches and surpasses price, then when price crashes, profitability drops off a ledge.
My mining contract that was producing plenty of Bitcoin at first, was now making nothing as the cost of electricity passed the price of mined Bitcoin. My miner never came and I was refunded the money. Lessons were learned and I realized I was not quite ready to take the plunge into mining Bitcoin. The risks and barriers to entry were high, even for an interested and technical person.
Fast forward to 2021, I had a newly inspired interest in Bitcoin based on the political and financial direction the world was going. I knew the world needed Bitcoin more than ever and I wanted to do my part as a citizen of the developing Bitcoin world – helping secure and protect the network by running my own node and miners.
With the knowledge that Bitcoin mining at home can be a costly endeavor with sometimes large, but potentially slim profit margins, I knew I needed to shift the profitability equation. I realized that if I could use the waste heat from the miners to heat my house, then the cost-benefit analysis of mining becomes much more favorable and sustainable. Decentralizing Bitcoin mining became too important to me and I had to learn to Mine 4 Heat.
As a long-time DIY’er and a technology-loving engineer, I was excited to solve this problem of mining heat exhaust. I knew I wanted to use the heat from the miners, but how? The simple answer is: put the miner in a room and use it as a space heater.
In theory, this does work. But there are still a couple of problems. First, the noise: it will be very loud and you will only heat one room (a lot) while not heating the rest of the house. I wanted to somehow tie in to my existing ductwork that already had the optimal airflow through the entire house. Second, sustainability: I also knew that for this to be sustainable in an active house, it had to be seamless, quiet, robust and automated. In my house, the attic was the optimal location where the furnace already resided and 16” of insulation would create an optimum sound barrier.
The first step was to put some ideas on the whiteboard.

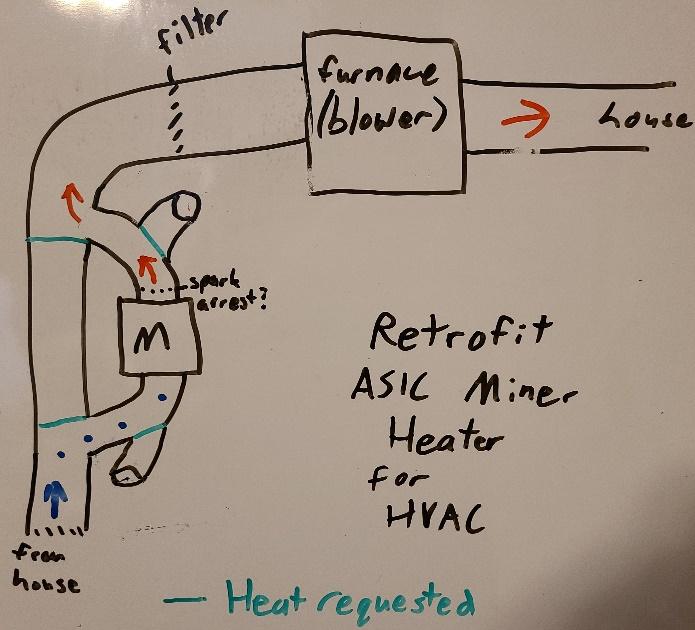
As the whiteboard sketches show, I devised two scenarios: heat requested and heat not requested. At this point I had no idea how I would accomplish the switch between heating and venting into the attic, but at least I had the idea visualized.
Once I had a concept, I now knew that I needed a container or box that was capable of safely holding the miners and funneling air through them. Since this was a proof of concept and test, I decided to first use Antminer S9’s that were a couple generations old in 2021 and thus relatively inexpensive. I settled on a box that would hold three Antminer S9’s, figuring that ~4500 watts running 24/7 would be enough to at least mostly heat my house.
After searching for pre-made metal boxes around this size I needed and not finding them, I ended up building the box myself. I took some measurements, and sketched out a box. The measurements of the box are 16.75” wide X 10.5” tall X 17” long. I used plywood, but wanted to make it a bit more like a duct box so I lined it with sheet metal. This would make the box heat and fire retardant. I also fastened some hinges to the top to make a simple and secure lid.

For the ductwork, I settled on 8” to keep ducting small enough to handle in the attic and a 10” would not have fit in my junction duct. I had calculated an 8.66” minimum duct size, but I knew I would be able to offset some loss in airflow size with a more powerful fan. (In hindsight, more airflow volume would have been better.)
After sourcing ducting parts at the local hardware store, I found a 14 x 6” register box that would serve as the air intake and outlet attachments to the box and ducting. I cut holes in the ends of the box and attached the registers. I attached an 8” inline duct fan and some 8” flex ducting. Then I bench tested my design. It was working!

The next step was to figure out the best way to tie it into my existing HVAC system while doing the least amount of permanent changes to it. I decided to connect the output of the Bitcoin miner heater to the intake register box. This way, when the furnace fan was on it would pull the hot air directly into the intake, but when the fan was off the miner could still dump hot air into the house, if need be.

Now that I had a box and ducting, the next step was to build the full system in the attic. I ducted in an intake to the house and the exhaust to the intake of the furnace. One of the first things I realized is that I needed a more powerful exhaust fan than the original 300 CFM inline fan. An upgraded 740 CFM fan helped it run much cooler, and the miner fans did not have to spin up as fast.
I used and tested the system in a manual fashion for several weeks. My proof of concept was working. Although the exit temp at vents was nowhere near the temp the furnace would output, I was not concerned. The purpose was for the miners to run all the time, so slow and steady heating was the name of the game.
BraiinsOS+ became my firmware of choice during this time, as the visibility into the miner operations is superior. I was also impressed with the firmware’s ability to dynamically scale hashrate based on temperature events. In my case, I could dynamically scale the miners down when temps were higher than normal (like a hotter day) and I did not need as much heat. At the time I also thought of the possibility of scaling hashrate up and down based on external temperature or smart home events, but integrations like that had not been built (yet)!
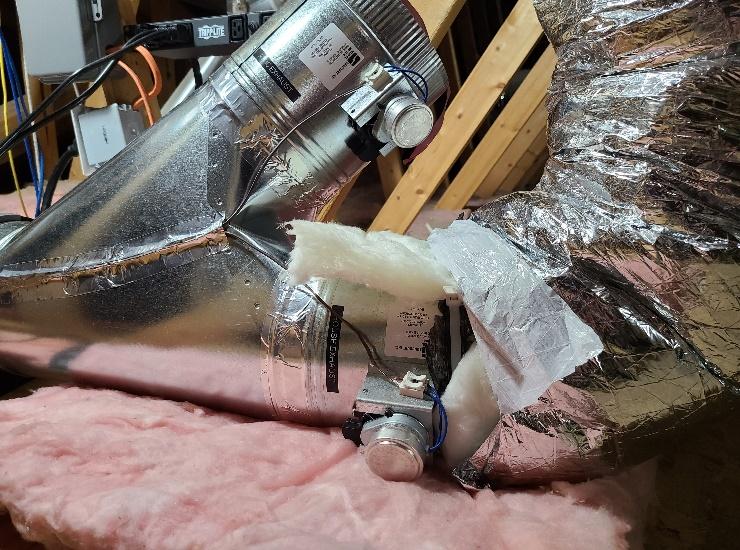
Once I had enough data to prove the heater was heating my house, I needed to automate the transition from heat to no heat. I decided to use some duct splitters and dampers. Dampers are normally used to control airflow to different parts of a house. They can be activated to change position with a 24V signal from a thermostat. In my case, the two dampers to and from the attic are unpowered open / power close, while the two dampers for the house are power open / unpowered close.
Effectively, when no heat is called for, dampers are in their unpowered state and airflow directs in and out the attic. When heat is called for, the thermostat powers all four dampers, they change position and direct airflow in and out of the house.

In order to tie in to the thermostat so that it heats or exhausts on demand from heating needs, I wired my Ecobee thermostat directly to them as a “stage 1” heater.
Now there would essentially be three different modes:


With this setup, I was now able to set my thermostat to whatever temperature I wanted, and the system would automatically switch dampers to control the miner heat flow into or out of the house. Also, in the event of extreme cold, “stage 2” was still available to kick on the main furnace heater and heat as normal. The Bitcoin miner heater was now thermostatically controlled.
The final step in the build was to add some safety features. An attic can be a hot, dry place, and when dealing with electronics in this environment, it’s important to keep fire safety in mind (especially in a residential setting).
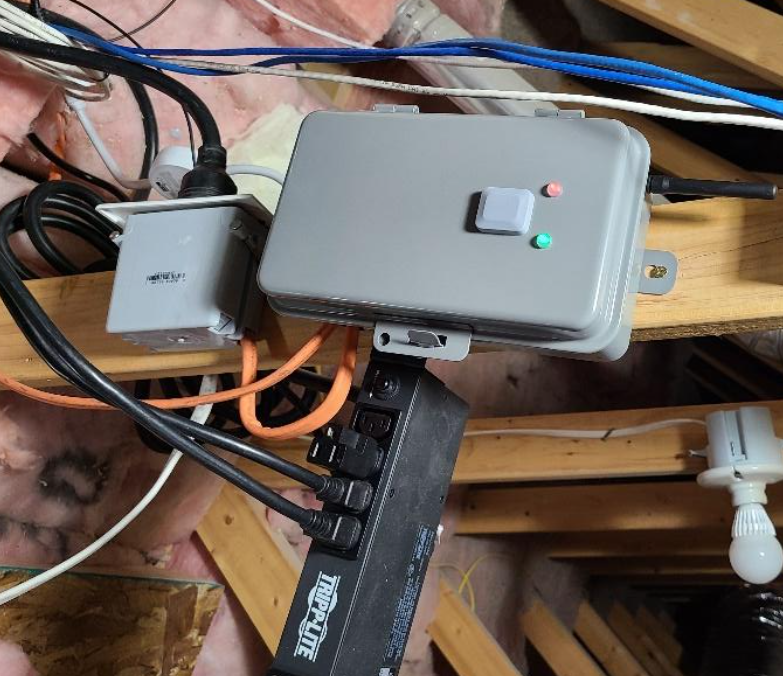
I already had a full smart home setup using a Hubitat smart home controller, so I knew that I could add some sensors and controllers to help automate this process as well. I found a 240V Zwave controller and a Zwave smoke alarm that would fit my needs nicely. I wired in the 240V smart controller to have full control of the miner circuit from the Hubitat. I put the Zwave smoke detector in the box. I had another smart switch connected to the inline exhaust fan, as well as temp sensors inside and outside of the box. On top of that, the Hubitat is also able to control the Ecobee thermostat and shut down the furnace as needed.

With all of the above resources, I built an automation that does the following:
If smoke or high temperature are detected, shut down miners, exhaust fan and furnace. Also, this event triggers the house alarm siren and turns on lights in the house to wake everyone up, as well as sending a notification to my phone. Theoretically since all airflow through the box is stopped, if there were a small fire it would be smothered due to lack of oxygen, or at least minimized due to cutting power. Just to be sure, everyone in the house is notified so that the problem can be investigated.
Finally, my Bitcoin miner heater was complete – thermostatically controlled and heating my house.
Here is the final layout:


Over the next few months, I collected data from my thermostat and smart home sensors to determine the effectiveness and efficiency of the system. The graph below shows that the system was able to maintain the set point temperature throughout varying outdoor temperature ranges.
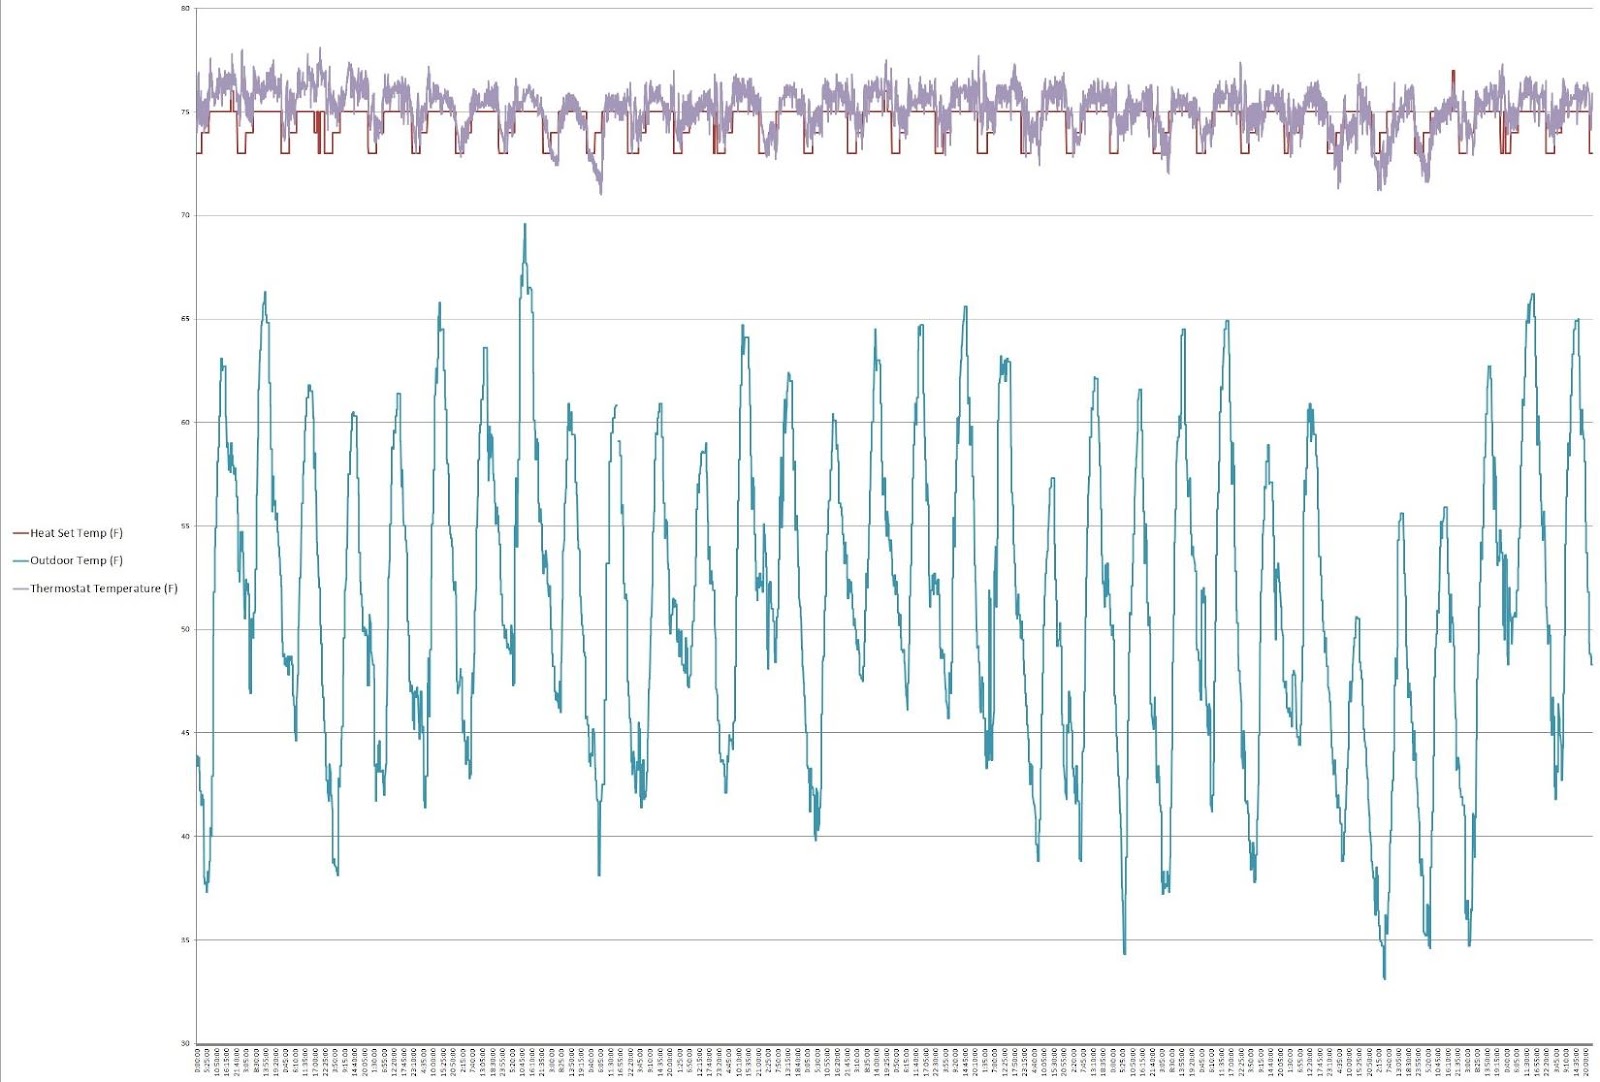
Total runtime of Stage 2 (primary heater) was minimized to 1.1 hours for the entire month, while the Bitcoin heater actively pumped heat into the house 46% of the month.

How efficient was the system? The table below shows some cost comparisons over a two-month period compared with the previous year. This data was compiled in February 2022 when the USD equivalent BTC price was approximately $43,000. Keep in mind that the cost and difficulty of Bitcoin mining varies greatly. Also, this is while mining with three of the least efficient ASIC miners in 2022, Antminer S9’s. New miners are approximately 3-4 times more efficient, so numbers would be much better.

Mining 4 Heat is an effective way to move the profitability equation in favor of small mining operations. Since building this system I have begun developing an immersion based Bitcoin water heating system that has applications in heating homes, pools, water heaters, greenhouses, and more. These systems are in their infancy, but with the innovation of the Bitcoin community, mining will stay highly decentralized through deeper integration into heating applications.
This article was written for the Braiins blog by TechEngineer. Follow his mining journey on Twitter by following @TechEngineer21, and see a full video walkthrough of his home mining heating system on YouTube here.
| Konference | Web | X | Where | When | Confirmed |
|---|---|---|---|---|---|
| Cell | Cell | Cell | Cell | ||
| Cell | Cell | Cell | Cell | ||
| Cell | Cell | Cell | Cell | ||
| Cell | Cell | Cell | Cell | ||
| Cell | Cell | Cell | Cell | ||
| Cell | Cell | Cell | Cell | ||
| Cell | Cell | Cell | Cell |
Bitcoin mining software company: Braiins Pool, Braiins OS+ & Stratum V2.
By miners, for miners.
Published
25.7.2022
Learn the basic mechanics of using mining heat exhaust to warm a home from the experiences and lessons of this at-home bitcoin miner.

Table of Contents
Becoming a Miner-Gardener
This article presents the first-hand experiences of TechEngineer, an at-home bitcoin miner using heat exhaust from mining machines to warm their house. Complete with photos, performance data, and some step-by-step instructions, this guide is the perfect beginner resource for miners interested in productive uses for the heat their machines create.
The date was November 29th, 2017. I was driving in my truck and heard on the radio that the price of Bitcoin had passed $10,000 for the first time in its history. That is the day that my journey began down the long and exciting rabbit hole of Bitcoin. I was intrigued and instantly drawn to the technology behind the most powerful decentralized computer the world had ever seen. I wanted to mine Bitcoin.
I attempted to buy my first miner, an Antminer S9 for a price of nearly $4,000 in the beginning of December 2017. The price of Bitcoin was skyrocketing at the time and so was the profitability of Bitcoin mining. There was a 45 day lead time on the miner I had paid for. During that 45 days I watched the price of Bitcoin peak and fall and in my FOMO I purchased a small mining contract. I learned that the incredible profitability of Bitcoin mining during a bull run does not last long. Network difficulty lags, but catches and surpasses price, then when price crashes, profitability drops off a ledge.
My mining contract that was producing plenty of Bitcoin at first, was now making nothing as the cost of electricity passed the price of mined Bitcoin. My miner never came and I was refunded the money. Lessons were learned and I realized I was not quite ready to take the plunge into mining Bitcoin. The risks and barriers to entry were high, even for an interested and technical person.
Fast forward to 2021, I had a newly inspired interest in Bitcoin based on the political and financial direction the world was going. I knew the world needed Bitcoin more than ever and I wanted to do my part as a citizen of the developing Bitcoin world – helping secure and protect the network by running my own node and miners.
With the knowledge that Bitcoin mining at home can be a costly endeavor with sometimes large, but potentially slim profit margins, I knew I needed to shift the profitability equation. I realized that if I could use the waste heat from the miners to heat my house, then the cost-benefit analysis of mining becomes much more favorable and sustainable. Decentralizing Bitcoin mining became too important to me and I had to learn to Mine 4 Heat.
As a long-time DIY’er and a technology-loving engineer, I was excited to solve this problem of mining heat exhaust. I knew I wanted to use the heat from the miners, but how? The simple answer is: put the miner in a room and use it as a space heater.
In theory, this does work. But there are still a couple of problems. First, the noise: it will be very loud and you will only heat one room (a lot) while not heating the rest of the house. I wanted to somehow tie in to my existing ductwork that already had the optimal airflow through the entire house. Second, sustainability: I also knew that for this to be sustainable in an active house, it had to be seamless, quiet, robust and automated. In my house, the attic was the optimal location where the furnace already resided and 16” of insulation would create an optimum sound barrier.
The first step was to put some ideas on the whiteboard.
As the whiteboard sketches show, I devised two scenarios: heat requested and heat not requested. At this point I had no idea how I would accomplish the switch between heating and venting into the attic, but at least I had the idea visualized.
Once I had a concept, I now knew that I needed a container or box that was capable of safely holding the miners and funneling air through them. Since this was a proof of concept and test, I decided to first use Antminer S9’s that were a couple generations old in 2021 and thus relatively inexpensive. I settled on a box that would hold three Antminer S9’s, figuring that ~4500 watts running 24/7 would be enough to at least mostly heat my house.
After searching for pre-made metal boxes around this size I needed and not finding them, I ended up building the box myself. I took some measurements, and sketched out a box. The measurements of the box are 16.75” wide X 10.5” tall X 17” long. I used plywood, but wanted to make it a bit more like a duct box so I lined it with sheet metal. This would make the box heat and fire retardant. I also fastened some hinges to the top to make a simple and secure lid.
For the ductwork, I settled on 8” to keep ducting small enough to handle in the attic and a 10” would not have fit in my junction duct. I had calculated an 8.66” minimum duct size, but I knew I would be able to offset some loss in airflow size with a more powerful fan. (In hindsight, more airflow volume would have been better.)
After sourcing ducting parts at the local hardware store, I found a 14 x 6” register box that would serve as the air intake and outlet attachments to the box and ducting. I cut holes in the ends of the box and attached the registers. I attached an 8” inline duct fan and some 8” flex ducting. Then I bench tested my design. It was working!
The next step was to figure out the best way to tie it into my existing HVAC system while doing the least amount of permanent changes to it. I decided to connect the output of the Bitcoin miner heater to the intake register box. This way, when the furnace fan was on it would pull the hot air directly into the intake, but when the fan was off the miner could still dump hot air into the house, if need be.
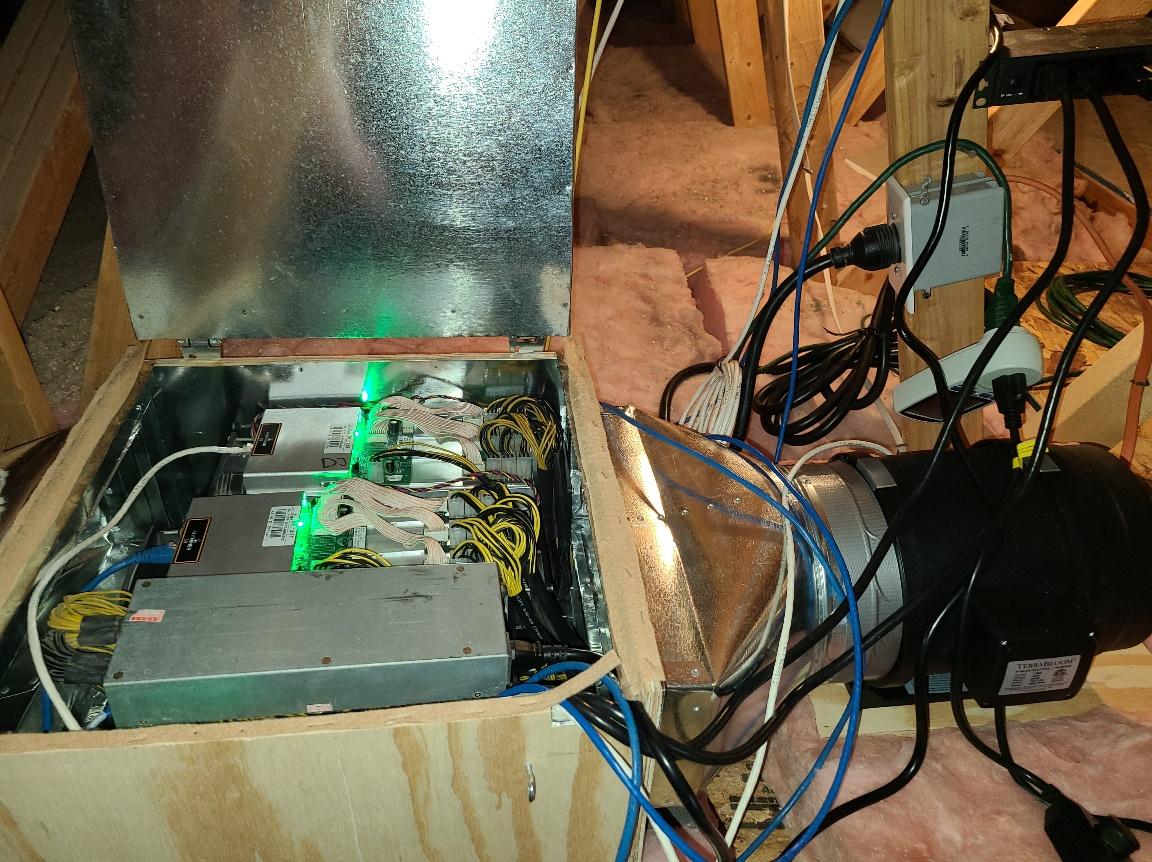
Now that I had a box and ducting, the next step was to build the full system in the attic. I ducted in an intake to the house and the exhaust to the intake of the furnace. One of the first things I realized is that I needed a more powerful exhaust fan than the original 300 CFM inline fan. An upgraded 740 CFM fan helped it run much cooler, and the miner fans did not have to spin up as fast.
I used and tested the system in a manual fashion for several weeks. My proof of concept was working. Although the exit temp at vents was nowhere near the temp the furnace would output, I was not concerned. The purpose was for the miners to run all the time, so slow and steady heating was the name of the game.
BraiinsOS+ became my firmware of choice during this time, as the visibility into the miner operations is superior. I was also impressed with the firmware’s ability to dynamically scale hashrate based on temperature events. In my case, I could dynamically scale the miners down when temps were higher than normal (like a hotter day) and I did not need as much heat. At the time I also thought of the possibility of scaling hashrate up and down based on external temperature or smart home events, but integrations like that had not been built (yet)!
Once I had enough data to prove the heater was heating my house, I needed to automate the transition from heat to no heat. I decided to use some duct splitters and dampers. Dampers are normally used to control airflow to different parts of a house. They can be activated to change position with a 24V signal from a thermostat. In my case, the two dampers to and from the attic are unpowered open / power close, while the two dampers for the house are power open / unpowered close.
Effectively, when no heat is called for, dampers are in their unpowered state and airflow directs in and out the attic. When heat is called for, the thermostat powers all four dampers, they change position and direct airflow in and out of the house.
In order to tie in to the thermostat so that it heats or exhausts on demand from heating needs, I wired my Ecobee thermostat directly to them as a “stage 1” heater.
Now there would essentially be three different modes:
With this setup, I was now able to set my thermostat to whatever temperature I wanted, and the system would automatically switch dampers to control the miner heat flow into or out of the house. Also, in the event of extreme cold, “stage 2” was still available to kick on the main furnace heater and heat as normal. The Bitcoin miner heater was now thermostatically controlled.
The final step in the build was to add some safety features. An attic can be a hot, dry place, and when dealing with electronics in this environment, it’s important to keep fire safety in mind (especially in a residential setting).
I already had a full smart home setup using a Hubitat smart home controller, so I knew that I could add some sensors and controllers to help automate this process as well. I found a 240V Zwave controller and a Zwave smoke alarm that would fit my needs nicely. I wired in the 240V smart controller to have full control of the miner circuit from the Hubitat. I put the Zwave smoke detector in the box. I had another smart switch connected to the inline exhaust fan, as well as temp sensors inside and outside of the box. On top of that, the Hubitat is also able to control the Ecobee thermostat and shut down the furnace as needed.
With all of the above resources, I built an automation that does the following:
If smoke or high temperature are detected, shut down miners, exhaust fan and furnace. Also, this event triggers the house alarm siren and turns on lights in the house to wake everyone up, as well as sending a notification to my phone. Theoretically since all airflow through the box is stopped, if there were a small fire it would be smothered due to lack of oxygen, or at least minimized due to cutting power. Just to be sure, everyone in the house is notified so that the problem can be investigated.
Finally, my Bitcoin miner heater was complete – thermostatically controlled and heating my house.
Here is the final layout:
Over the next few months, I collected data from my thermostat and smart home sensors to determine the effectiveness and efficiency of the system. The graph below shows that the system was able to maintain the set point temperature throughout varying outdoor temperature ranges.
Total runtime of Stage 2 (primary heater) was minimized to 1.1 hours for the entire month, while the Bitcoin heater actively pumped heat into the house 46% of the month.
How efficient was the system? The table below shows some cost comparisons over a two-month period compared with the previous year. This data was compiled in February 2022 when the USD equivalent BTC price was approximately $43,000. Keep in mind that the cost and difficulty of Bitcoin mining varies greatly. Also, this is while mining with three of the least efficient ASIC miners in 2022, Antminer S9’s. New miners are approximately 3-4 times more efficient, so numbers would be much better.
Mining 4 Heat is an effective way to move the profitability equation in favor of small mining operations. Since building this system I have begun developing an immersion based Bitcoin water heating system that has applications in heating homes, pools, water heaters, greenhouses, and more. These systems are in their infancy, but with the innovation of the Bitcoin community, mining will stay highly decentralized through deeper integration into heating applications.
This article was written for the Braiins blog by TechEngineer. Follow his mining journey on Twitter by following @TechEngineer21, and see a full video walkthrough of his home mining heating system on YouTube here.
By subscribing you agree with Privacy Policy


.svg)

.jpg)
.png)